
From the Toysit archive
Mirror Jewelry Box Kit
Explore Mirror Jewelry Box Kit through its mirrored lid, compartments and decorative details, then sketch a box that reflects the treasures it will hold.
The play at a glance
A keepsake box with your own design on the lid
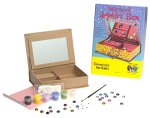
An open box, a mirror and a scattering of decorating supplies fill Toysit’s original photograph. Behind them, the package shows a finished example. The two views invite the maker to imagine the change from a plain surface to a personal keepsake.
The earlier account describes a divided interior, including a place for rings, with a mirrored lid held open by a ribbon. Paint, small sparkling accents and a pink lining make the inside and outside parts of the same design.
Let the lid introduce the collection
Imagine a box for a favorite bracelet and a few small souvenirs. A wavy border might recall a beach trip; a cluster of flowers might celebrate a garden. The decoration can hint at the objects that wait inside.
Start with one large shape in the middle of a drawn lid. Add a smaller repeated mark along the edge: dots, leaves or short stripes. Leaving some plain space around the center gives that main shape room to stand out.
Make a place for each small treasure
Draw the open box from above and divide it into three areas. Give each area a purpose. One could hold a bracelet, another a ring and another a folded message or a tiny keepsake drawing.
Carry a color from the lid into the interior sketch. A little blue border outside might become a blue lining inside. The paired drawings let the maker see the box as a whole, from the first glimpse of its lid to the arrangement revealed when it opens.
Sketch a treasure box inside and out
- Draw two rectangles: one for the lid and one for the open interior.
- Choose a theme connected to something you enjoy.
- Give the lid a central picture and a repeating border.
- Divide the interior into three spaces and draw the objects each could hold.
- Repeat one color across both views and give the box a name.
This original Toysit activity uses paper and coloring materials. For a physical box, follow the directions supplied with the actual paints, glue and finishes, and protect the work surface.
The historical record
Original Toysit coverage
The original product account and commentary are preserved below as historical coverage.
Use acrylic paint in a modern palette to decorate your jewelry with a unique design.
Paint and decorate this mirrored box and transform it into a beautiful, personalized jewelry holder for your rings, necklaces, bracelets, and pins. The box, which is made of stiff cardboard covered in plain brown paper, has three compartments, including one for holding rings, and a flip-up mirrored lid that is held in place by a white satin ribbon. A small brush and a set of nontoxic acrylic paints--in black, yellow, lavender, blue, and green--provide the palette for your decorating inspirations. Start by painting the box to suit your fancy. When the paint is dry, apply a coat of the clear varnish, and then, using the craft glue provided, apply the sparkling rhinestones for a finishing touch. Finally, use the sheet of pink velour peel-and-stick paper to provide an elegant lining for the inside of your jewelry box. The paint dries permanently on most surfaces, so you'll want to line your work area with newspaper, wear old clothes, and wipe up spills right away with soapy water. There's nothing more spectacular than a sparkly box to hold your special items. Use acrylic paint in a modern palette to decorate your jewelry with a unique design. Add rhinestones for glittery accents. There's velvet paper to line the box. And surprise, you'll find a mirror inside.
An art kit that allows you to paint your own jewelry box adds multiple layers of enjoyment and fulfillment to the creative experience. Starting with a blank canvas, children are free to unleash their imagination and artistic prowess, using an array of colors and designs to make the jewelry box uniquely theirs. This form of self-expression provides not only an outlet for creativity but also offers a sense of accomplishment once the project is complete. The finished jewelry box becomes more than just a container for trinkets; it's a personalized keepsake that bears the mark of the child's own handiwork. Furthermore, this activity hones fine motor skills and encourages attention to detail, from painting intricate patterns to perhaps even adding small embellishments like gems or stickers. The art kit also provides a fantastic opportunity for parent-child bonding, making for a fun and productive way to spend quality time together. The end result is not just a painted jewelry box, but a memorable experience and a tangible expression of individuality.
Sources and editorial notes
This profile uses the original photograph and detailed Toysit account. Exact packaging and instructions for B00004TFGG remain unrecovered; box material, supplied finishes and their application sequence remain attributed to the earlier coverage. Newer mirror-box kits have different constructions. The inside-and-out sketch is an original paper activity; no physical testing was performed.
- Original Toysit image — Existing same-site photograph reviewed for the visible design and retained unchanged.
- Original Toysit coverage — Full original product account and historical commentary preserved.

Images and descriptions are retained as historical material. How Toysit covers toys.
Created for Toysit by Tabbloza — the artwork in our header.