
From the Toysit archive
Glass Painting Jewelry Box Kit
Explore Glass Painting Jewelry Box Kit through its butterfly picture and bold outlines, then design a colorful panel with a palette of your own.
The play at a glance
A butterfly picture, one bright section at a time
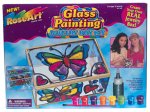
A butterfly spreads across the box pictured on the RoseArt package. Dark outlines divide its wings into small areas of color, giving the image a patchwork of bright shapes. The edges hold the picture together while each section offers a fresh color choice.
The original Toysit account describes a hinged glass box with a mirrored bottom and templates for butterflies, hearts and daisies. Its outline-and-fill idea is easy to explore on paper: draw the structure of a picture, then decide how the colors will sit beside one another.
Let the lines divide the picture
Start with a simple flower or butterfly outline. Add a few curved lines inside it to make separate areas. A broad wing might hold a band near its edge and two round spots near its center. A flower might have one circle surrounded by five petals.
Look at the spaces as well as the subject. A large area gives one color room to stand out; several small areas make a more detailed pattern. Keeping the first drawing simple leaves plenty of room to try different combinations.
Compare neighboring colors
Imagine a yellow petal beside a deep blue background. Now picture that same yellow beside orange. The outline stays the same, but the neighboring colors change how strongly the petal stands out.
Make a second copy of the picture and swap two colors. Keep the outline and the other colors fixed so the change is easy to see. A maker might prefer the brighter contrast for a cheerful gift or a quieter combination for a box beside a favorite book.
Draw an outlined color panel
- Draw a rectangle for the panel and add a simple butterfly or flower.
- Divide the subject into a few enclosed shapes with clear outlines.
- Choose three colors and fill the sections.
- Copy the outline and exchange two of the colors.
- Place the versions side by side and give each a title.
This original Toysit activity uses paper and coloring materials. For a physical glass-painting project, an adult should help choose suitable materials and follow their matching handling and finishing directions.
The historical record
Original Toysit coverage
The original product account and commentary are preserved below as historical coverage.
Before older children try their hand at stained glass, they may want to start with this painted jewelry box kit.
Before older children try their hand at stained glass, they may want to start with this painted jewelry box kit. The three-step process begins with choosing one of the kit's design templates (butterflies, hearts, or daisies). The next step is to trace the template onto the glass box using liquid leading--a gray, gooey substance that flows out of a squirt bottle. (Crafters must keep the squeeze pressure even, otherwise the lead lines look wobbly and blotchy.) The final step is to paint in the design using the eight brightly colored paints (paintbrush included). The trick is to get even coverage so it looks like sheets of glass rather than streaks of paint. The hinged box has a mirrored bottom and makes for great jewelry storage.
A glass painting kit that allows kids to paint a glass jewelry box in patterns resembling stained glass provides a unique blend of creativity, skill-building, and aesthetic satisfaction. This hands-on activity not only stimulates artistic expression but also offers a functional end result: a personalized jewelry box to keep or gift. The process of selecting colors, applying them carefully to the glass, and then watching the hues blend and catch the light mimics the magical allure of actual stained glass. This activity holds the excitement of transforming a simple object into a thing of beauty, all while teaching focus, patience, and attention to detail. It's a wonderful way for children to experience the joy of creation, and the finished product becomes a cherished keepsake or a heartfelt gift.
Sources and editorial notes
The original RoseArt package image and Toysit account support this profile. Exact packaging fine print and complete instructions for the recorded kit remain unrecovered. The original descriptions of glass, outlining medium, templates and eight paints stay attributed to that account; material formulas and drying steps remain unverified. The color-panel activity is an original paper design. No physical testing was performed.
- Original Toysit image — Existing same-site photograph reviewed and retained unchanged.
- Original Toysit coverage — Complete original product account and historical commentary preserved.

Images and descriptions are retained as historical material. How Toysit covers toys.
Created for Toysit by Tabbloza — the artwork in our header.